Financial & Accounting
The Financial and Accounting module provides the structure and functionalities necessary for accurate financial recording, reporting, and analysis within your organization.
It is organized into three key components:
- Ledger: The Ledger in Composity's Accounting Module is a fundamental tool for recording and managing financial transactions, enabling detailed and efficient tracking of financial activities.
- Chart of Accounts: With the Chart of Accounts, you can categorize financial transactions and organize accounting records effectively.
- Journal: The Journal feature helps you maintain well-organized and categorized financial records, with the ability to specify the type (e.g., sales, purchases, or other).
Adding Chart of Accounts
To create a new chart of accounts entry:
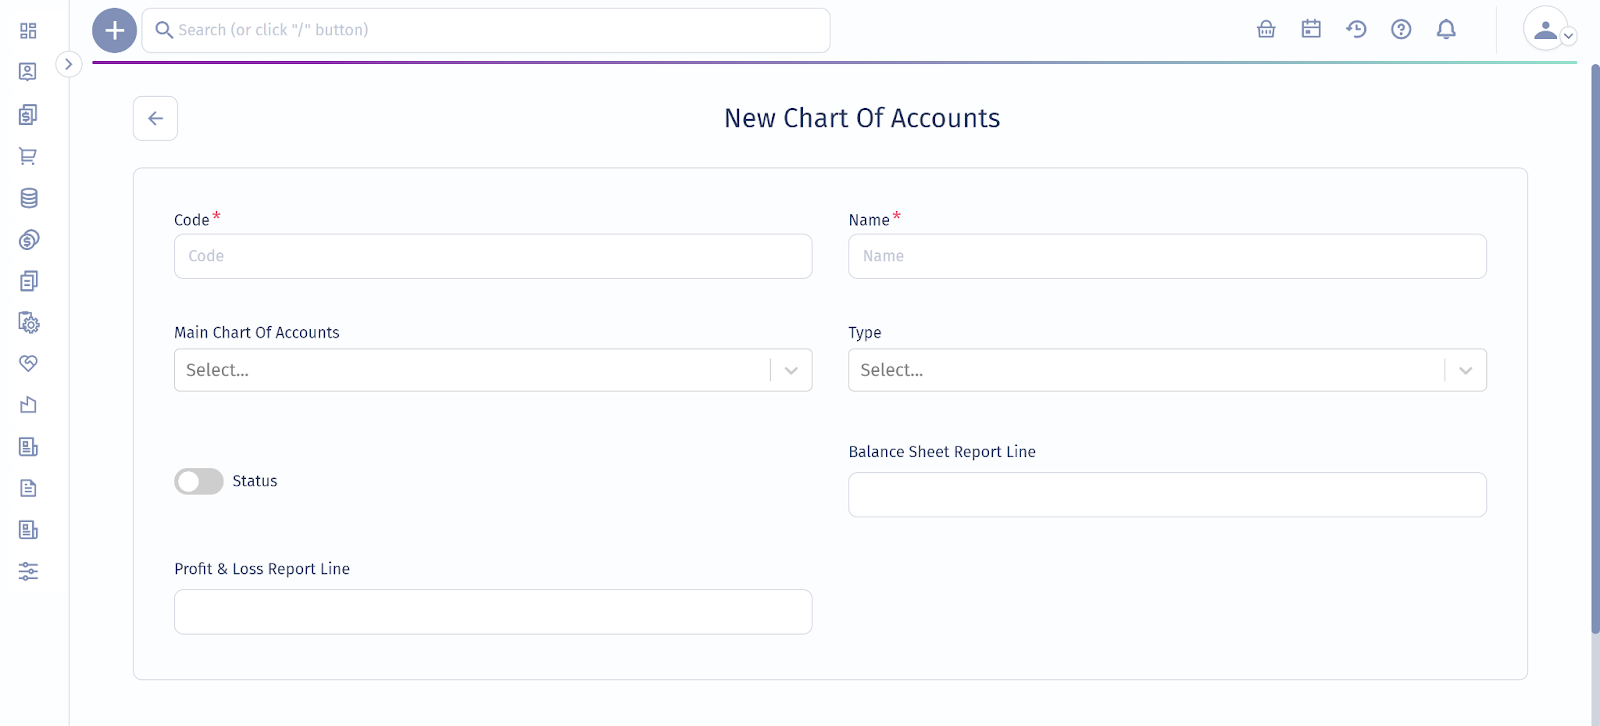
- Click on the "New" button.
- Code: Provide a unique code to distinguish this entry.
- Name: Specify a descriptive name that clearly represents the purpose of the account.
- Main chart of accounts: Select from the pre-fetched options based on your initial chart of accounts setup.
- Type: Indicate whether the entry pertains to the Balance Sheet, Profit/Loss, or Customer/Suppliers.
- Status: Specify whether the entry is active.
- Save the chart of accounts.
Adding a Journal
To create a new journal:
- Click on the "New" button.
- Fill in the required fields: Assign a unique code and name for identification.
- Type: Choose the appropriate category such as Sales, Purchase, or Other.
- Status: Specify if the journal is currently active.
- Save the journal.
Adding a Ledger
To create a new ledger entry:

- Click on the "New Ledger" button.
- Select the status: Choose from Draft, Soft Posted, or Hard Posted.
- Specify the company: Assign the ledger entry to a specific company.
- Journal: Pick a previously created journal within Composity.
- Set the date and period: Record the financial transaction accurately.
- Description: Optionally provide a brief memo to clarify the ledger entry.
- Add additional rows: If multiple transactions are involved, click "Add Row" to include each individually.
- Account details: For each row, include the reference, chart of account, amounts in original and local currencies, exchange rate, and debit or credit information.
- Billing data: Optionally include related billing data such as location, project, item, asset, and description.
- Save the ledger.
Asset Management
The Asset section allows you to track and manage your organization's assets, including their depreciation and related financial data.
To create and manage assets:
- Click on "New Asset" in the Asset section.
Fill in the required fields:
Basic Details
- Code: Provide a unique identifier for the asset.
- Name: Specify the name of the asset.
Depreciation Settings
- Is accounting depreciable?: Indicate if the asset is subject to accounting depreciation.
- Is tax depreciable?: Indicate if the asset is subject to tax depreciation.
Location and Type
- Location: Specify the asset’s location by selecting from the available options.
- Type: Choose the asset type from the predefined list.
User Assignment
- User: Assign the asset to a user.
Acquisition Details
- Acquisition Date: Record the date the asset was acquired.
- Acquisition Value: Enter the purchase value of the asset.
Depreciation Information
- Depreciation Value Initial: Specify the initial depreciation value, if applicable.
- Depreciation Rate: Set the monthly depreciation rate.
- Depreciation Amount (Monthly): The system calculates the monthly depreciation amount based on the entered rate.
- Period Start and Period End: Define the duration for the depreciation period.
- Period Last Depreciation: Record the date of the last depreciation entry.
Tax Depreciation Information
- Depreciation Rate Tax: Specify the depreciation rate for tax purposes.
- Depreciation Amount Tax: The system calculates the tax depreciation amount based on the entered rate.
- Period Start Tax and Period End Tax: Define the tax depreciation period.
Chart of Account
Chart of Account: Link the asset to a specific chart of accounts entry by selecting from the list and save.