CMS
Content management provides all the tools you need to manage and organize your website's content effectively. Using the content management system, you can create pages, publish articles, organize content into categories, and gather surveys from site visitors.
Pages
Website pages can be created in Composity, allowing you to manage content and appearance as needed. To create a new page, follow these steps:
Access the Settings
Navigate to the Settings menu and go to Form Types.
From the content type dropdown, select Page.
- Provide the following details for your page:
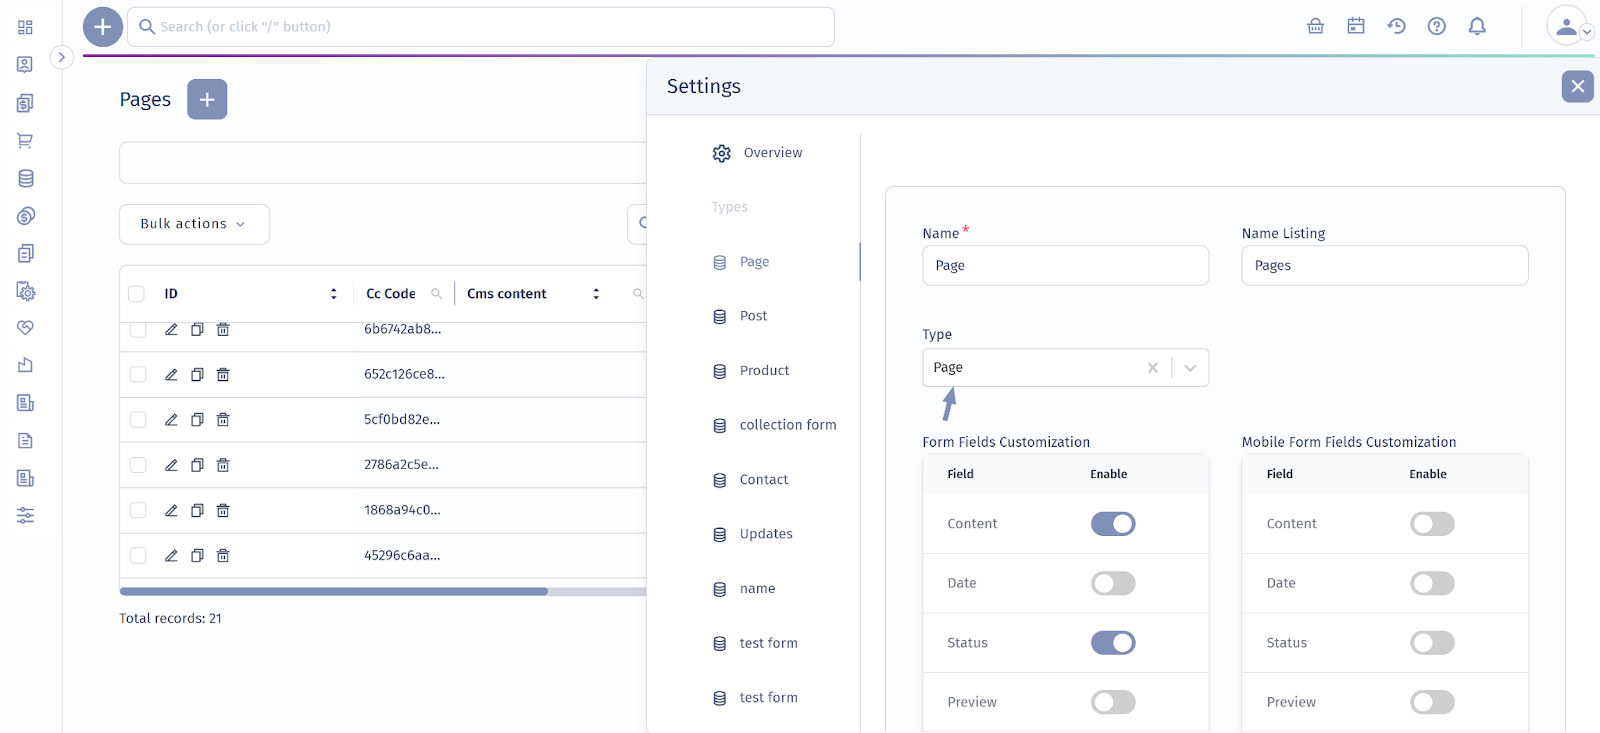
Cms Content: Choose or create content to associate with this page.
Language: Specify the language in which the content is written.
Channel: Select the channel or platform where this page will be listed (e.g., Bulgarian, International).
Route: Define the URL route or path for the page (e.g., /What-is-erp). Note that special characters are not allowed in URLs.
Route Full: Enter the complete URL path for the page.
Page Title: Specify the title of the page that appears in the browser tab and search engine results.
Page Description: Provide a brief description of the page's content, often used in search engine results.
Meta Title: Set the SEO title tag for the page, used by search engines to display the page in search results.
Meta Description: Include a summary of the page's content for search engine results pages.
Content Data: Add specific data related to the content, such as phone numbers or email addresses.
Collection Element: Choose the type of element within a collection for categorization.
Redirect To: Specify a URL or document for redirection purposes, if needed.
Documents: Attach any relevant media from the library for the page content.
Content Body: Enter the main content that will be displayed on the page.
Elements: Include additional components or categories related to the page.
Item: Specify any related items or entities associated with the content.
To make the page live, publish it by clicking on Status to make it visible to your website visitors.
Note: If you prefer that the page does not appear in the pages, you can disable the status option.
Managing Pages
When managing your pages in Composity Workspaces, you have the flexibility to enhance their layout and content by adding various sections. This allows you to tailor each page's appearance and functionality to better meet your needs. Here’s a detailed guide on how to add and customize sections within your pages:
Adding Sections: Sections are modular components that structure the content on your website, helping to organize information visually and functionally. They enable you to create engaging layouts and customize your site’s appearance by combining various section types, such as banners, call-to-action (CTA) areas, and hero sections.
You have two main options for adding sections:
- Add from Existing Sections
Select pre-defined sections that you’d like to reuse from existing ones. Create New Section
Add a new section from scratch by specifying various details.
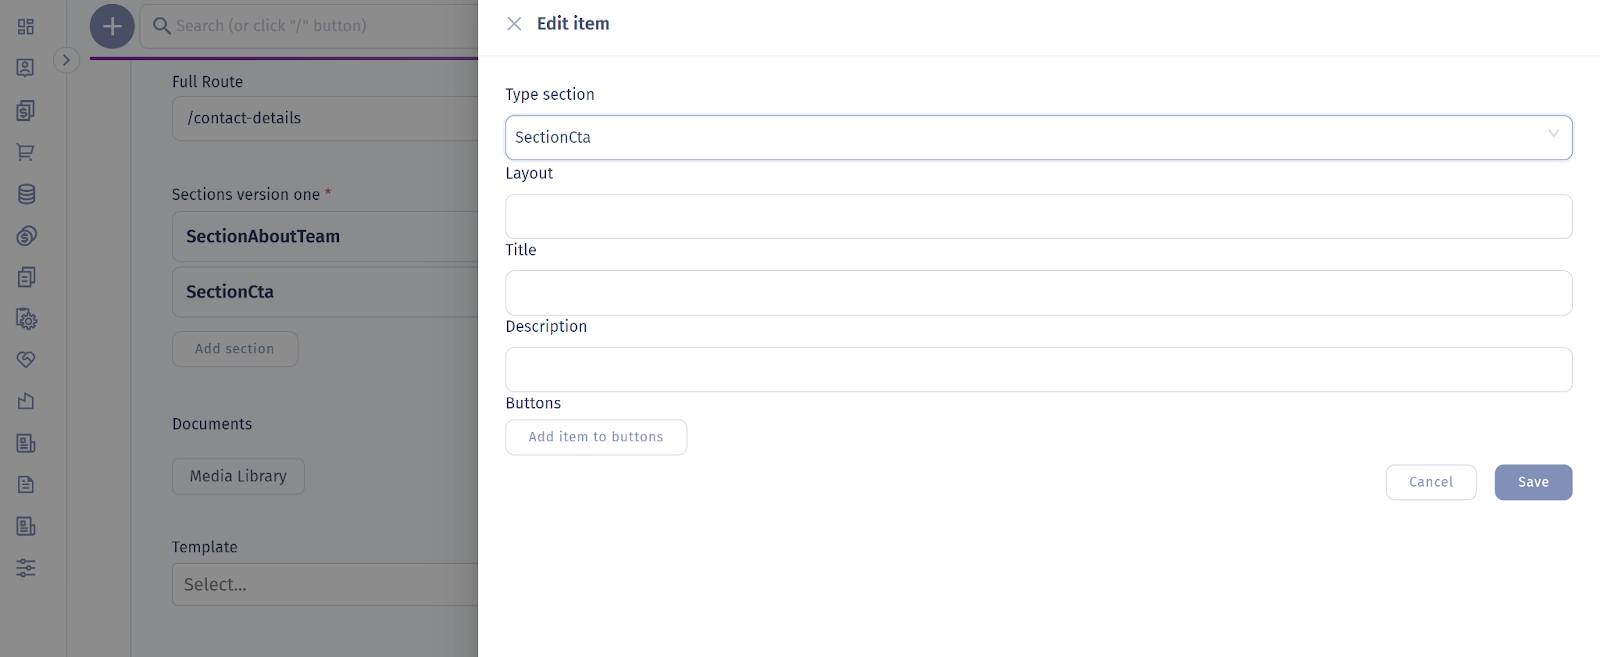
Creating a New Section
To create a new section, fill out the following details:
- Name
Enter a descriptive name for the section. This helps you identify it easily when managing multiple sections. - Type
Choose the type of section you want to add, such as a CTA Section, Hero Section, or Banner Section. - Language
Specify the language for the section if your site supports multiple languages. - Content
Add content specific to the section. The fields available here depend on the section type you’ve chosen. For instance:- CTA Section
Enter a title for the call-to-action, specify the button text, and provide the link for the button. - Hero Section
Configure a layout, add a headline, subheadline, and a background image or video.
- CTA Section
Editing Sections
Each section added to the page can be customized further:
- Edit: Click the Edit button next to the section name to modify its content or configuration.
- Delete: To remove a section, click the Delete button.
Example Configuration for a CTA Section
- Section Type
CTA (Call-to-Action). - Layout: Choose from options like Centered, Left Aligned, or Right Aligned.
- Title: Enter the main message or call-to-action title.
- Button Text: Specify the text that will appear on the call-to-action button.
- Button Link: Provide the URL to which the button should link.
Online Products
Adding a product to your online store is similar to adding pages to your site. All you have to do is specify the type of content in the form. To add new product page form:
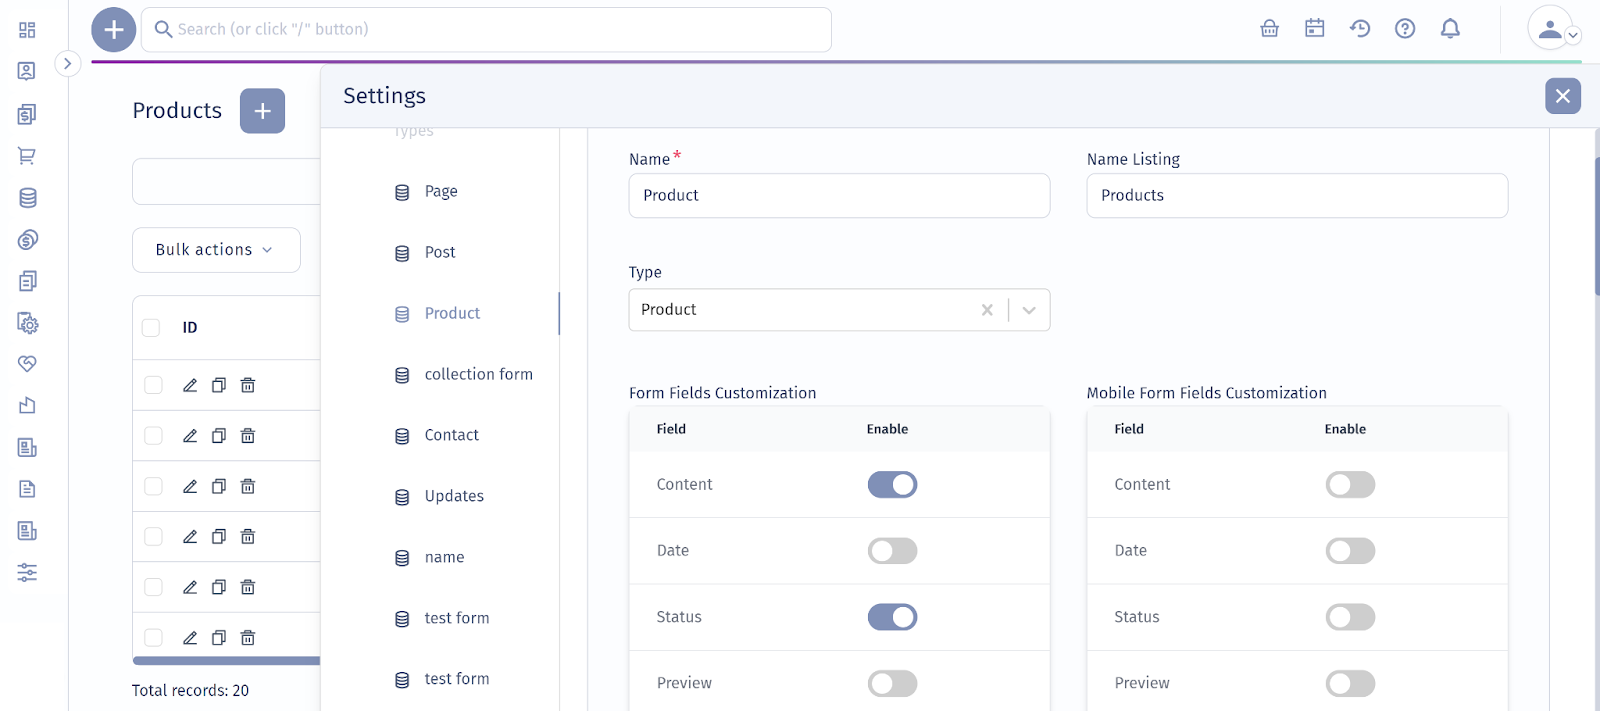
Settings ‣ Product
- Select Product from the content type.
Fill Out Product Details:
- CMS Content: Enter the name or identifier for the product.
- Type: Specify the type of product.
- Priority: Set the priority level for the product if applicable. This can influence the display order or prominence of the product in lists.
- Status:
Indicate the status of the product, such as Active or Inactive. - Channel: Select the channel or platform where this product will be listed (e.g., Bulgarian, International).
- Language: Specify the language for the product details, such as Bulgarian.
- Route: Define the URL route for the product page.
- Full Route: Provide the complete URL path for the product, such as
product/scanner. - Page Title: Enter the title of the product page that will appear in the browser tab and search engine results.
- Page Description: Provide a brief description of the product’s content, which will be displayed in search engine results.
- Meta Title: Input the SEO title tag for the product page, used by search engines.
- Meta Description: Write a summary of the product’s content for search engine results pages.
- Add Documents: Attach any relevant documents or media to the product page. You might need to select a template if applicable.
- Content Body: Fill in the main content area with detailed information about the product. This includes descriptions, specifications, features, and other relevant details.
- Elements: Add any additional elements or markers relevant to the product, such as:
- Markers: For tagging or categorizing the product.
- Outlet: Specify the sales outlet or distribution channels if applicable.
Once you’ve filled out all the necessary details and customized the product page, click Save.
Menus
To keep your content organized and easily accessible, the CMS module in Composity Workspaces allows you to create and manage menus and sub-menus. This feature helps you define a hierarchy of navigation items for your site.
To create a new menu, follow these steps:
- Navigate to the Menus section within the CMS module.
- Click on New to start creating a new content menu.
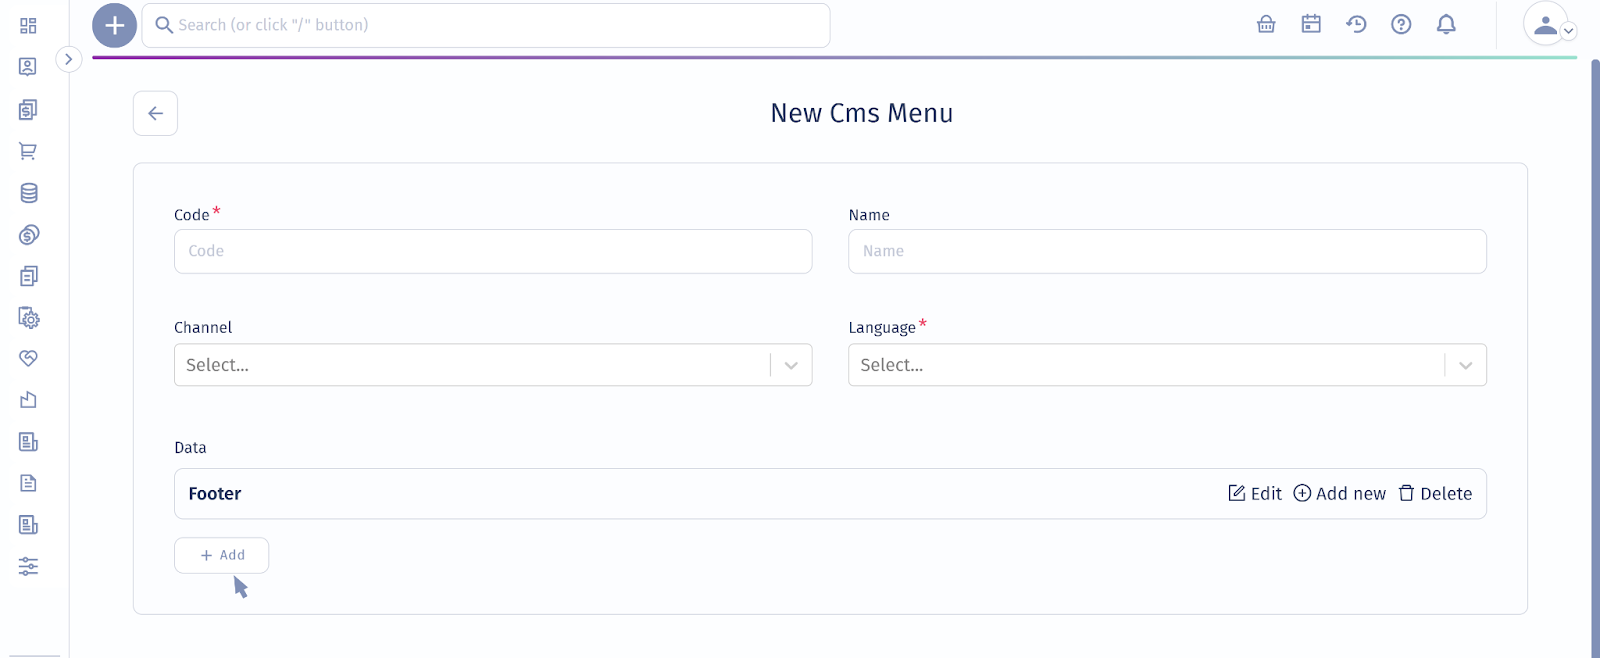
Fill Out Menu Details:
- Code
Provide a unique code for the menu to easily identify and reference it within the system. (Required)- Example:
footer_menu_code
- Example:
- Name
Enter the name of the menu, which will serve as its label in the interface. (Required)- Example: Footer
- Channel
Optionally, specify the channel or platform where the menu will be used.- Example: International or Bulgaria
- Language
Choose the language in which the menu will be displayed to ensure it matches the audience's preferences. (Required)- Example: English
- Data
This section includes the structure and content of the menu. Define its elements as follows: (Required)- Name: The name of the menu item (e.g., Products, Solutions).
- URL: The link associated with the menu item.
- Image: An optional image to be displayed with the menu item.
- Banner: An optional banner linked to the menu item.
- Description: A brief description of the menu item.
- Content Lists: Additional content lists or elements linked to the menu item.
After filling in all the required fields and configuring the menu data, click Save to create the menu.
You can further organize your menus by creating sub-menus and defining their hierarchy to suit your site’s navigation structure.
Collections
In Composity Workspaces, collections are tools for categorizing and organizing pages or products effectively.
Managing Collection Lists and Elements
- Collection Lists
Collection lists group pages or products under a common theme or category.
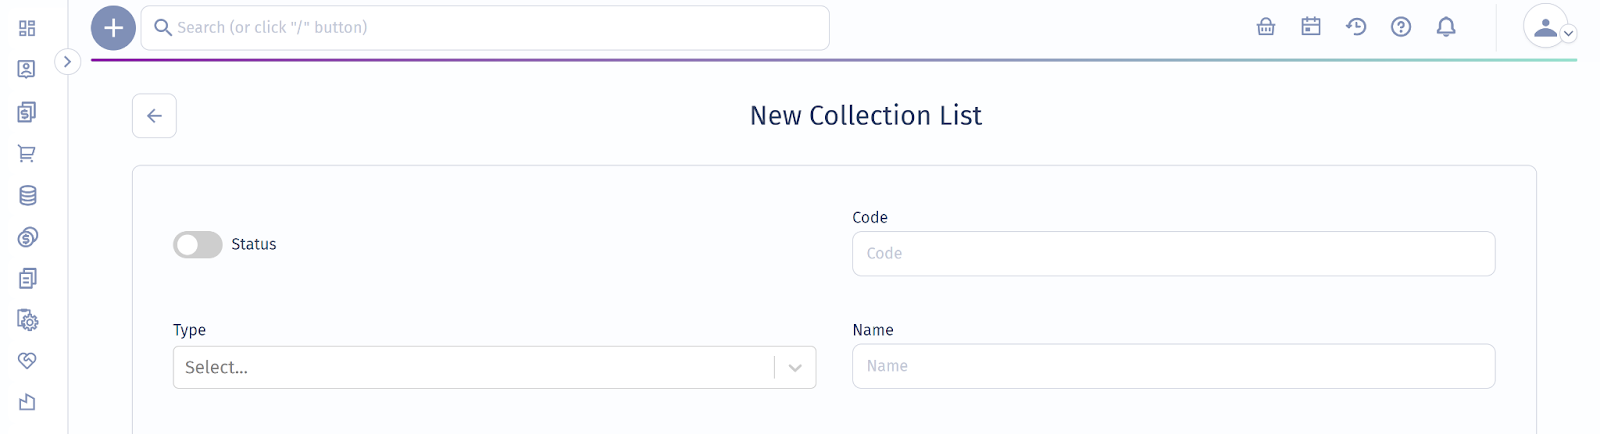
To Add a New Collection List:
- Go to Collections: Navigate to the Collections section in the CMS module.
- Add New Collection List: Click New to create a new collection list.
- Fill Out Details:
- List Name: Provide the name of the collection list.
Code: Enter a unique code for the collection list (e.g.,
010404).- Type: Specify the type of the list, such as category or collection.
- Status: Set the list to active for it to appear in your workspace.
- Collection Elements
Collection elements represent individual items within a collection list.
To Add a New Collection Element:
- Go to Collection Elements: Access the Collection Elements section in the CMS module.
- Add New Element: Click New to create a new element.
- Fill Out Details:
- Name: Enter the name of the collection element.
- Code: Assign a unique code to the element.
- Parent: Link the element to a parent collection list if applicable.
- Path: Define the URL path for the element.
- Status: Set the status of the element to active.
- Sort Order: Specify the order in which the element appears.
- Attachments: Add any related images or files.
- Create Route: Indicate whether a route should be created for the element.
- Save: Click Save to finalize the creation of the collection element.
Importing Contents
To efficiently manage large volumes of content or collection items, you can use the import functionality.
Steps for Importing:
- Go to Administration‣Data Import.
- Choose whether you want to import content or collections.
- Download the provided import template. This template includes predefined columns to match your data structure.
- Fill out the import template with your data, ensuring the headers and data format match the template.
- Click Import to initiate the process.
Tips for Successful Import:
- Match Column Headers: Ensure your file’s column headers exactly match those in the template.
- Check Data Format: Confirm the data aligns with the template’s expected format.
- Validate Import: After completing the import, verify that the data is correctly reflected in the system.
Note: Composity CMS forms support multilingual functionality, allowing you to add translations for various fields. To add a translation:
- Enter the text in the desired language into the field.
- Click “Add Translation.”