Sales and Invoices
The Composity Sales module manages the entire sales process, providing the tools needed to handle client transactions efficiently. It allows you to create detailed sales records, track progress, and manage payments and statuses all in one place.
In the Sales module, you can:
- Create Sales Records: Add sales directly linked to client accounts, including all relevant details such as items, quantities, and pricing.
- Generate and Send Invoices: Quickly create invoices based on sales records and send them directly to clients.
- Manage Payments: Record and track payments received for each sale, ensuring accurate financial records.
- Monitor Sales Status: Update and view the status of each sale, such as pending, completed, or canceled, to keep the process organized.
Create Sales
To create a new sales record, click the "New Sale" button in the Sales module. This will open a sales form where you can enter and configure various fields related to the sale.
- Customer: Begin by selecting the customer's name in the "Customer" field at the top of the form. This is a required field.
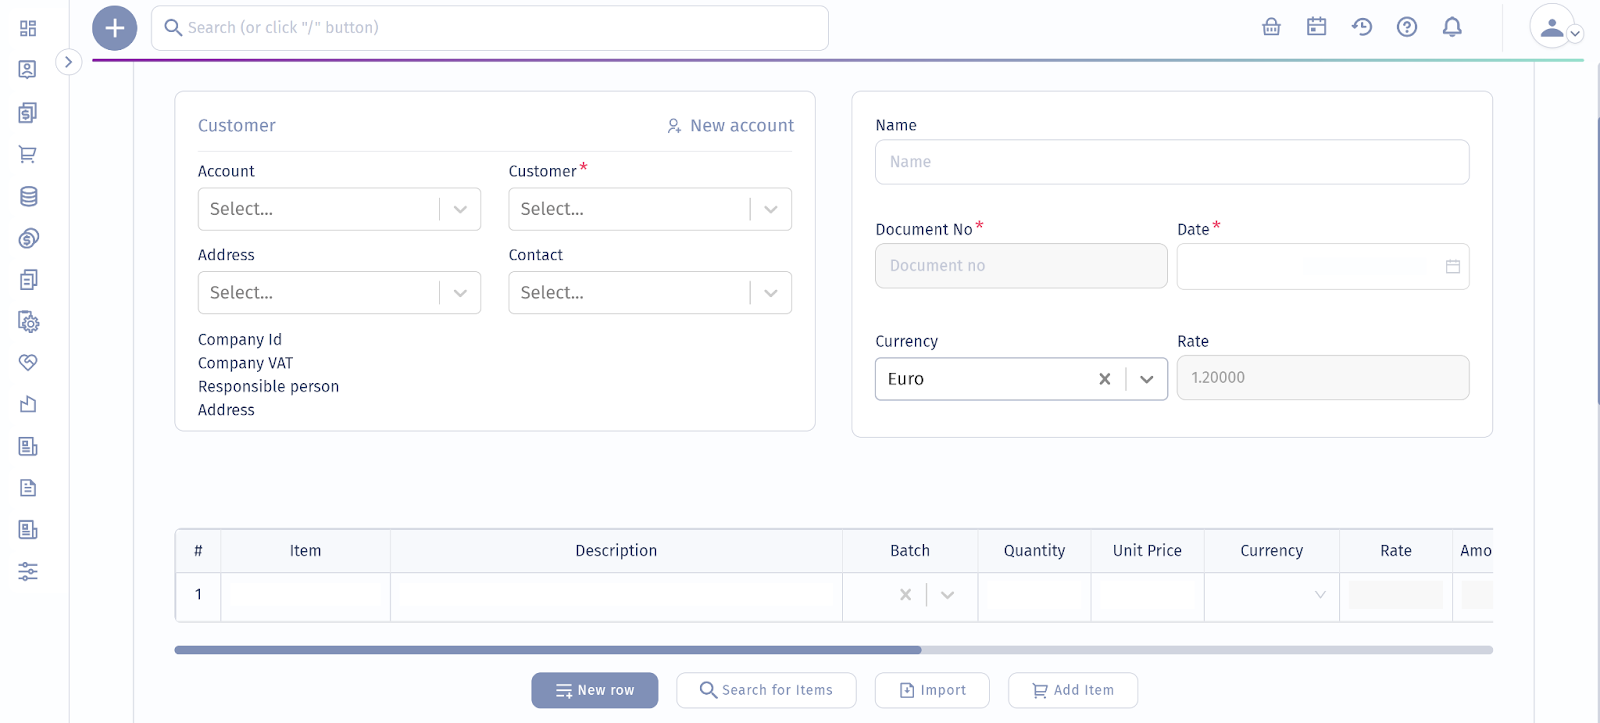
- If the customer’s information is already in the database, the "Company" and "Account" fields will auto-populate based on the saved information for those respective fields.
- If you need to add a new customer, use the "New account" option to create a new record.
Document Information
- Document No: Assign a unique number to the sale in the "Document No" field. This is a required field and serves as the primary identifier for the transaction.
- Date: The "Date" field will default to the current date, but you can modify it if needed to reflect the actual date of the sale.
- Currency: Select the currency for the transaction in the "Currency" field. The default currency is "BGN," but you can choose another currency as needed.
- Rate: The "Rate" field will display the exchange rate for the selected currency.
Note: Multiple currencies and rates can be added and set as default from the Administration‣Currencies section. This is important when selling products or services internationally, and transactions may occur in different currencies.
Adding Products/Services to the Sale
In the "Items" section, you have multiple ways to add products or services to the sale, ensuring flexibility and efficiency in managing your sales process:
Add Item Button
Click the "Add Item" button to open the item form. From here, you can:
- Add New Item: Enter the necessary details such as product name, description, unit of measure, and pricing. Once completed, save the item to include it in the list.
- Search Existing Items: Use the search function within the item form to find and select products already in the system.
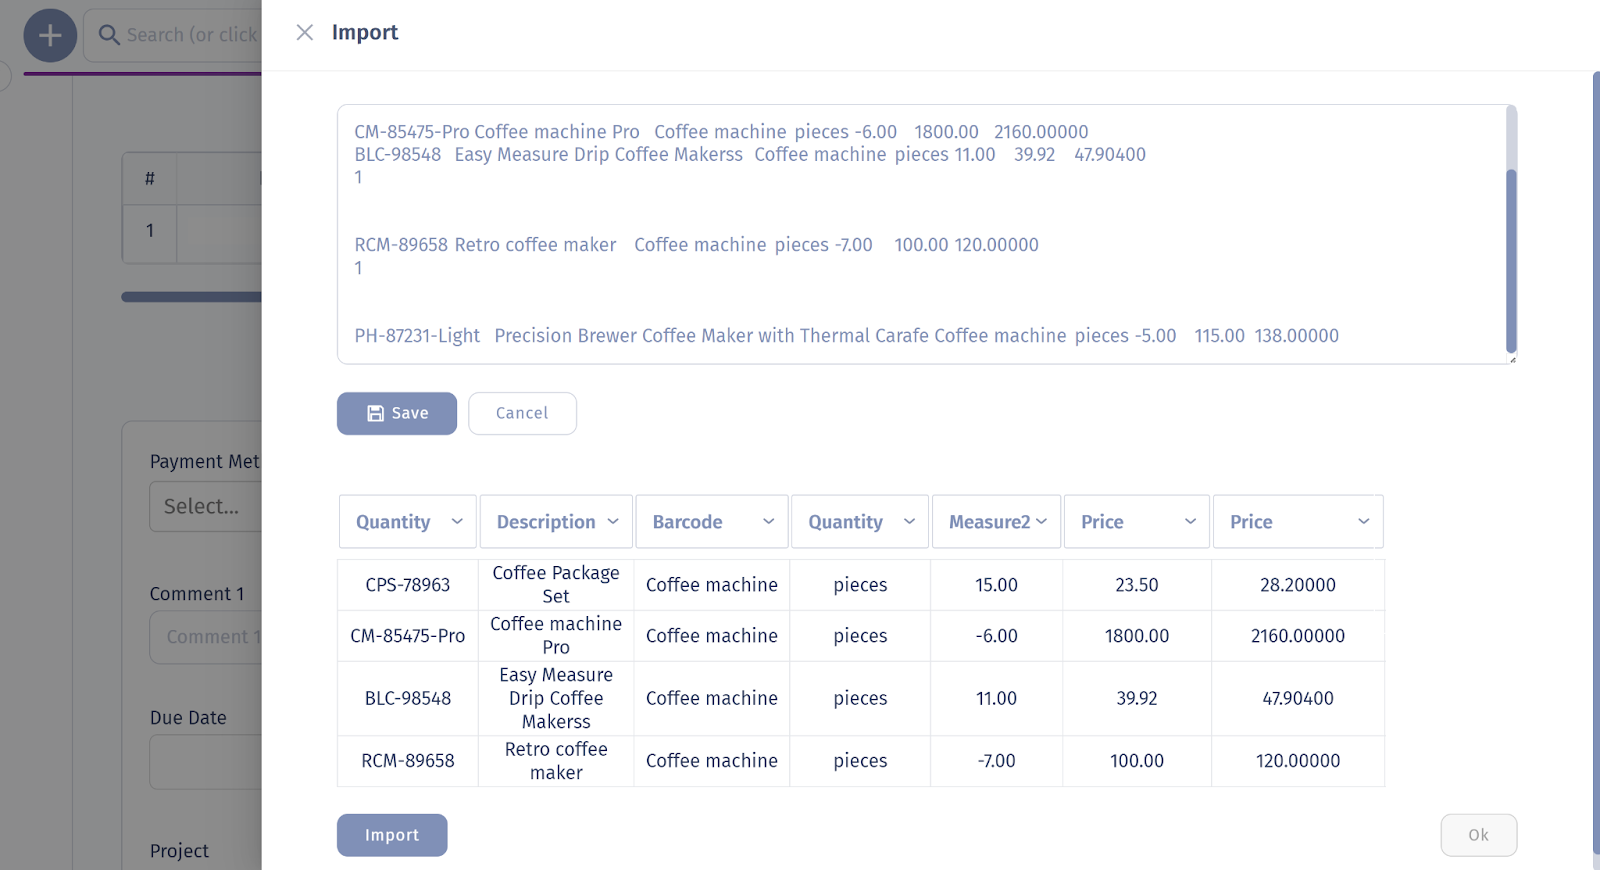
Import Items Option
For bulk additions, use the Import button. When you click on Import, a file upload field will appear, allowing you to import items directly from a spreadsheet. Follow these steps:
- Upload the File: Copy the rows from a sheet to the field.
- Assign Column Headers: Map the spreadsheet columns to the relevant fields (e.g., Product Name, Quantity, Unit Price) to ensure accurate data import.
Save and Populate: Click Save to complete the import. The items list will be automatically populated with the imported data.
The "Items" list can be managed and expanded from the "Administration" > "Items" section, where you can view, edit, or delete items as needed.
Invoices
You can generate invoices directly from sales records. When you fill out the sales form, simply select the "Issue Invoice" option at the end of the form to create an invoice instantly.
Invoice Overview:
Each invoice contains key details, including:
- Status: Displays the current status of the invoice, such as Paid or Unpaid.
- Payment Status: Indicates whether the invoice has been paid.
- Amount: Shows the total amount due.
- Due Date: Lists the payment deadline.
- Creation Date: Marks when the invoice was generated.
- Owner: Identifies the individual responsible for the invoice.
Adding Payments
Sales payments can easily be generated. This process involves creating a new payment form, where you can specify the amount and payment method. The payment form can have different statuses, such as "Posted" and "Archived," to help you keep track of your financial transactions effectively.
Note: : Payment methods are selected or added from the Administration ‣Payment methods, which you can configure according to your business requirements.
Managing the Invoice Document
Within the invoice profile, navigate to the "Invoice" tab to access the generated invoice document. Here, you have several options:
- Edit: Modify any details of the invoice as needed.
- Send: Easily send the invoice via email using a variety of pre-made templates or by creating a custom email. Additionally, you can create a task related to this invoice, helping to manage follow-ups or related actions efficiently.
After a new sale is recorded in Composity, all relevant details can be viewed and managed within the Sale Profile.
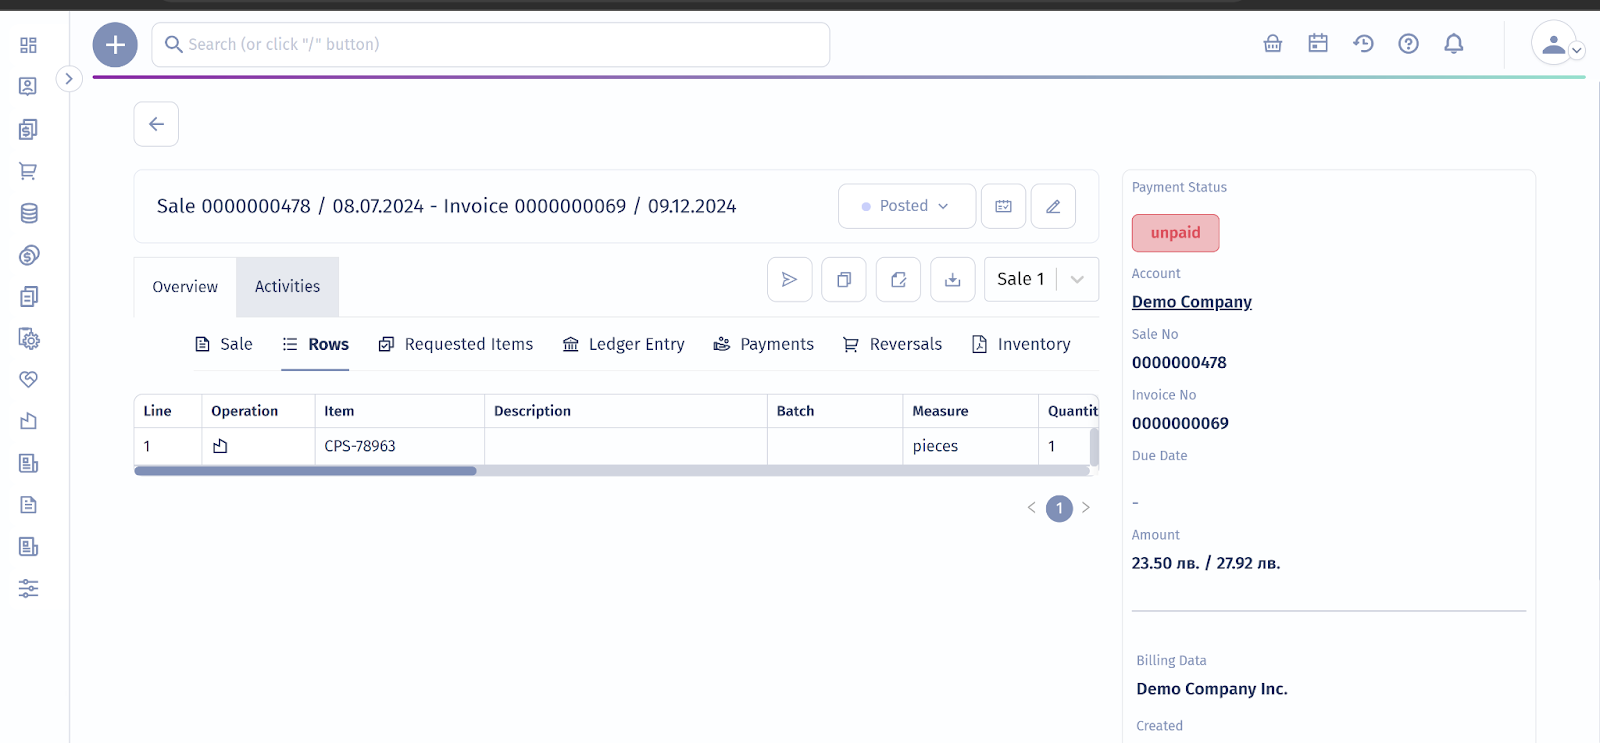
Key Sections in the Sale Profile:
Payments: This section allows you to view and manage payments associated with the sale. You can add new payments, update existing ones, or track the overall payment history.
Reversed Sales: If any sales have been reversed, they will be listed here.
Inventory Receipts: Displays receipts related to inventory items associated with the sale. You can view or download these receipts directly from the Sale Profile.
Logged Changes: Tracks all changes made to the sale profile, providing an audit trail of who made what changes and when. This is crucial for maintaining accurate records and ensuring transparency.
Sale Rows: Lists all items or services included in the sale, along with their descriptions, ordered quantities, and received quantities. This helps you track the fulfilment of the sale.
Create Tasks: Allows you to create tasks related to the sale, such as follow-up actions, customer communication, or delivery arrangements. You can categorise tasks to keep everything organized and ensure that no critical steps are missed.
Note: Both invoice and sale templates can be customized to meet your specific needs. To adjust these templates, navigate to Administration‣Templates‣Sales. Here, you can modify the layout, fields, and appearance of your sales documents to ensure they align with your business requirements.
Sales Forms
Sales forms can be accessed from the basic settings or sales settings within your system. From this list, you have the flexibility to edit existing system-defined forms or create entirely new ones to accommodate different sales models within your organization. For instance, a separate form can be added for online sales to effectively manage order processing and track payments.
Naming and Stages
The first step in creating or editing a sales form is to assign a clear and descriptive name to the form. This name will be used internally by system users and should accurately reflect the type of sale the form is intended for. You also have the option to select a Default Stage. If this field is left blank, the system will automatically apply the default stage set by the system.
After naming the form, you can define the stages that a sale will progress through. These stages should align with your sales process, ensuring that the form supports the flow of transactions from initiation to completion.
Customizing Form Fields
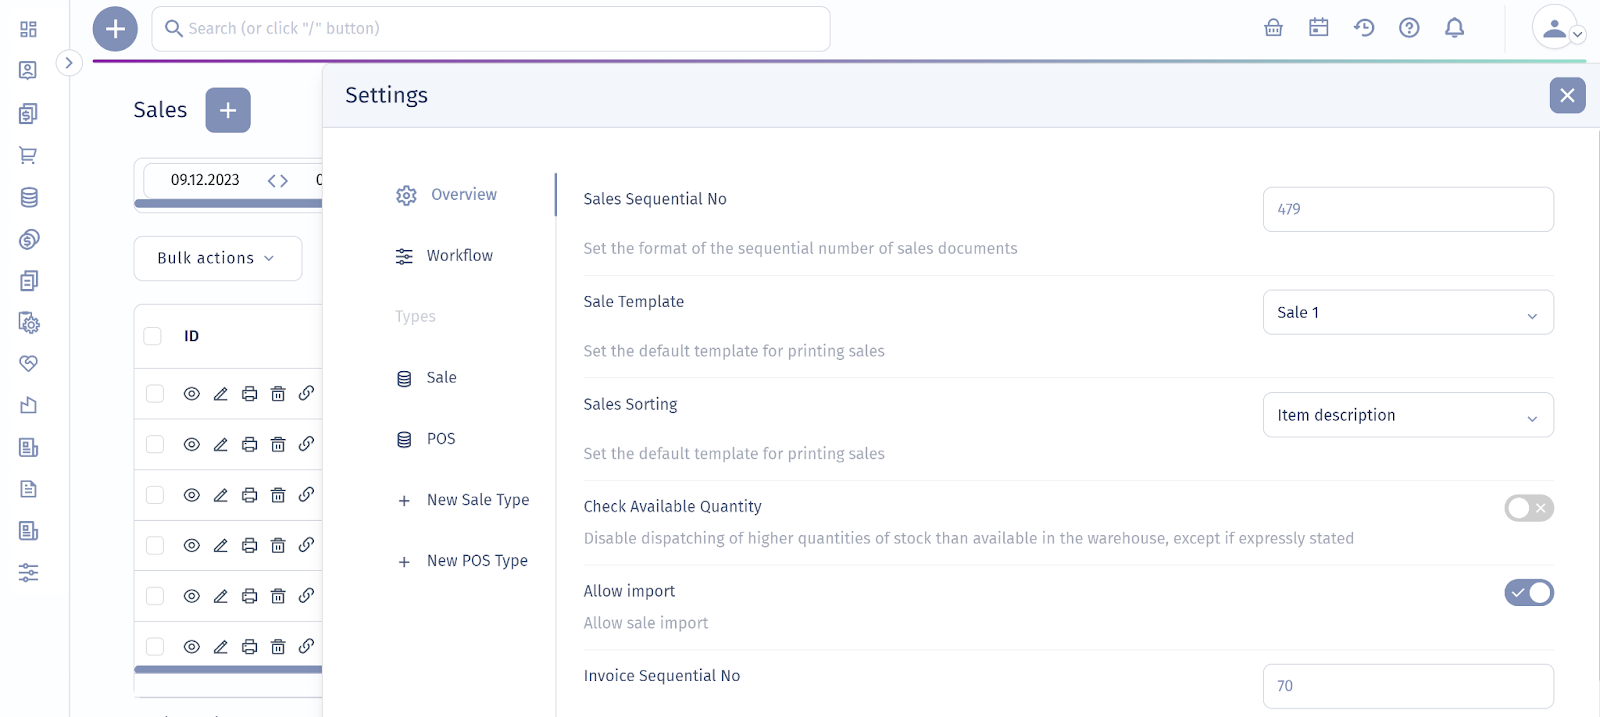
In the top-right corner of the sales grid, you will find the Settings menu, where you can customize your sales records to align with your business needs. From this menu, you can configure the default sales template for downloads, set up sequential numbering, manage imports, adjust sorting preferences, and customize the type of sales form.
Sales forms are equipped with various fields that can be activated or deactivated based on your company's specific requirements. The availability of these fields may also vary depending on whether the system is being accessed via a mobile device or desktop. Key fields that can be customized include:
Company and Location
Specify the company and location associated with the sale. This helps ensure that all transactional data is tied to the correct entity, streamlining communication and record-keeping.
Account and Payment Method
Define the customer account and payment method. The payment method can include options like bank transfer or credit card. Additionally, set Incoterms and Due Date. These are essential for managing shipping terms and setting due dates for payments, particularly important in international sales or complex transactions.
Multi-Currency and Automatic Accounting
For businesses dealing with multiple currencies, these fields ensure that all financial aspects are accurately recorded. The Multi-Currency field allows for transactions to be processed in different currencies. The Automatic Accounting feature can streamline the bookkeeping process by automatically recording financial transactions, reducing manual effort.
Item Details
Customize item-related fields such as batch availability, measure, quantity, price, discounts, and taxes. These fields are essential for businesses with extensive product catalogs or those that require detailed tracking of inventory and pricing. They help ensure that each item is properly accounted for in terms of stock levels, pricing adjustments, and tax rates.
Point of Sale (POS)
The Composity Point of Sale (POS) module offers a complete system for managing your in-person sales. Accessible from the top menu, it is integrated with fiscal devices to ensure precise recording of all transactions.
Recording Sales: From the home screen, you can quickly select a client and the products they wish to purchase. Once the details are confirmed, click on the Pay and Finish button to complete the sale. This process ensures that sales are recorded promptly and accurately.
Viewing POS Transactions: All transactions processed through the POS are stored under the Sales tab. This allows you to access a complete history of POS sales, making it easy to review, manage, or audit transactions as needed.
Generating Payments: Payments for recorded sales are listed directly from the POS module. This feature ensures that financial records remain up-to-date and linked to the corresponding sales.
Managing Products: The Items tab also serves as the hub for product management. You can add new products, update existing ones, or remove items no longer in use. This functionality ensures your POS system reflects the latest inventory.
Generating Reports: The module provides reporting tools to analyze sales performance. You can generate reports by client or product, offering valuable insights into purchasing trends, sales volume, and client preferences.
